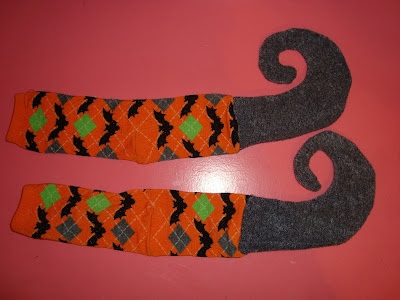
This project literally cost me out-of-pocket...only $1!!!!
When I got home I pulled out some "scrap clothes" that I had just received from a co-worker and got to work!! All I used for this project was her old sweat pants and my new $1 socks! (plus my sewing machine and thread of course :)
I started by cutting out the shape of the shoes from the sweat pants. I definitely did a couple of test drawings before I started free-hand cutting. Don't laugh--I promise, I really CAN draw! :) Make sure to cut out two of each side of the feet. Sew each front and back piece of the feet together wrong sides out, leaving the top open.


Cut off the ends of the socks to have two openings at each end and sew in the heel to "take away" the foot so that it creates one long tube.
Flip both the feet and socks wrong side out and pin the right sides together at the openings all the way around for each foot.
Next, sew them together!! Make sure to keep pushing the sock ends to the back of where are you are sewing as to not sew the sock to itself or shut!!
PS--Don't worry, I take my pin out when I sew! I had it in to hold the fabric together so that I could take a photo :)
This is what they should look like--flat, and somewhat "not right." I feared that SOMETHING was wrong--that either the feet were too small, or the legs weren't long enough, but fear not!!
STUFF these suckers very tight and they will turn out beautifully! And forget using true"stuffing..."
I used plastic bags and it worked perfectly--go green! :) (& cheap!)
Add your embellishments--ribbons, bling, etc!
I tied off the open ends with rubber bands and was done!
Now, stick them under a desk, bed, table, chair...whatever you like!
Look HOW cute they are!! I LOVE them!
Everyone in the office loves them too!
Hahaha, they make me smile every time I see them!
I embellished my sign with spider web ribbon and added my garland along with my candy jar and I now think it's super fun!
I think this is sufficient decor for my desk!
And all for only $3!! :)


13 comments:
These are adorable! I want to make some for my desk too, lol. And on a side note, I have the exact same garland hanging in my cubicle at work... love it!
LOVE your witches feet!!!!
Those are adorable!! Great job!!
so darn cute. LOVE THIS IDEA! great job! Jen
Super cute! Love that you decorate your office. Great job on the budget and keeping it green!
I'm gonna do this with my mother's motorized cart.I'll be sure to send you a pic.This is so great and so simple.It's a "Why didn't I think of that?".
I love this! Hopefully I will get a chance to make a pair of my own! Thanks for sharing!
Definitely send over photos, I'd love to see what ya'll come up with! :) I just made my second pair last night that I'll be posting on my twitter account--someone at work loved them so much she wanted a pair of her own!
So cute! Thanks for linking up to Mad Skills Monday!
tee hee these are adorable =) The front of my desk doesn't touch the floor =/ and the desk at our new office doesn't either -- boo lol
What a cute idea! Thanks for linking up this week!
thanks for linking up to Sew Woodsy!
They made me smile too! Just too cute!!
Post a Comment