Showing posts with label cricut. Show all posts

Sunday, December 26, 2010

Custom Tile Coasters {Tutorial}

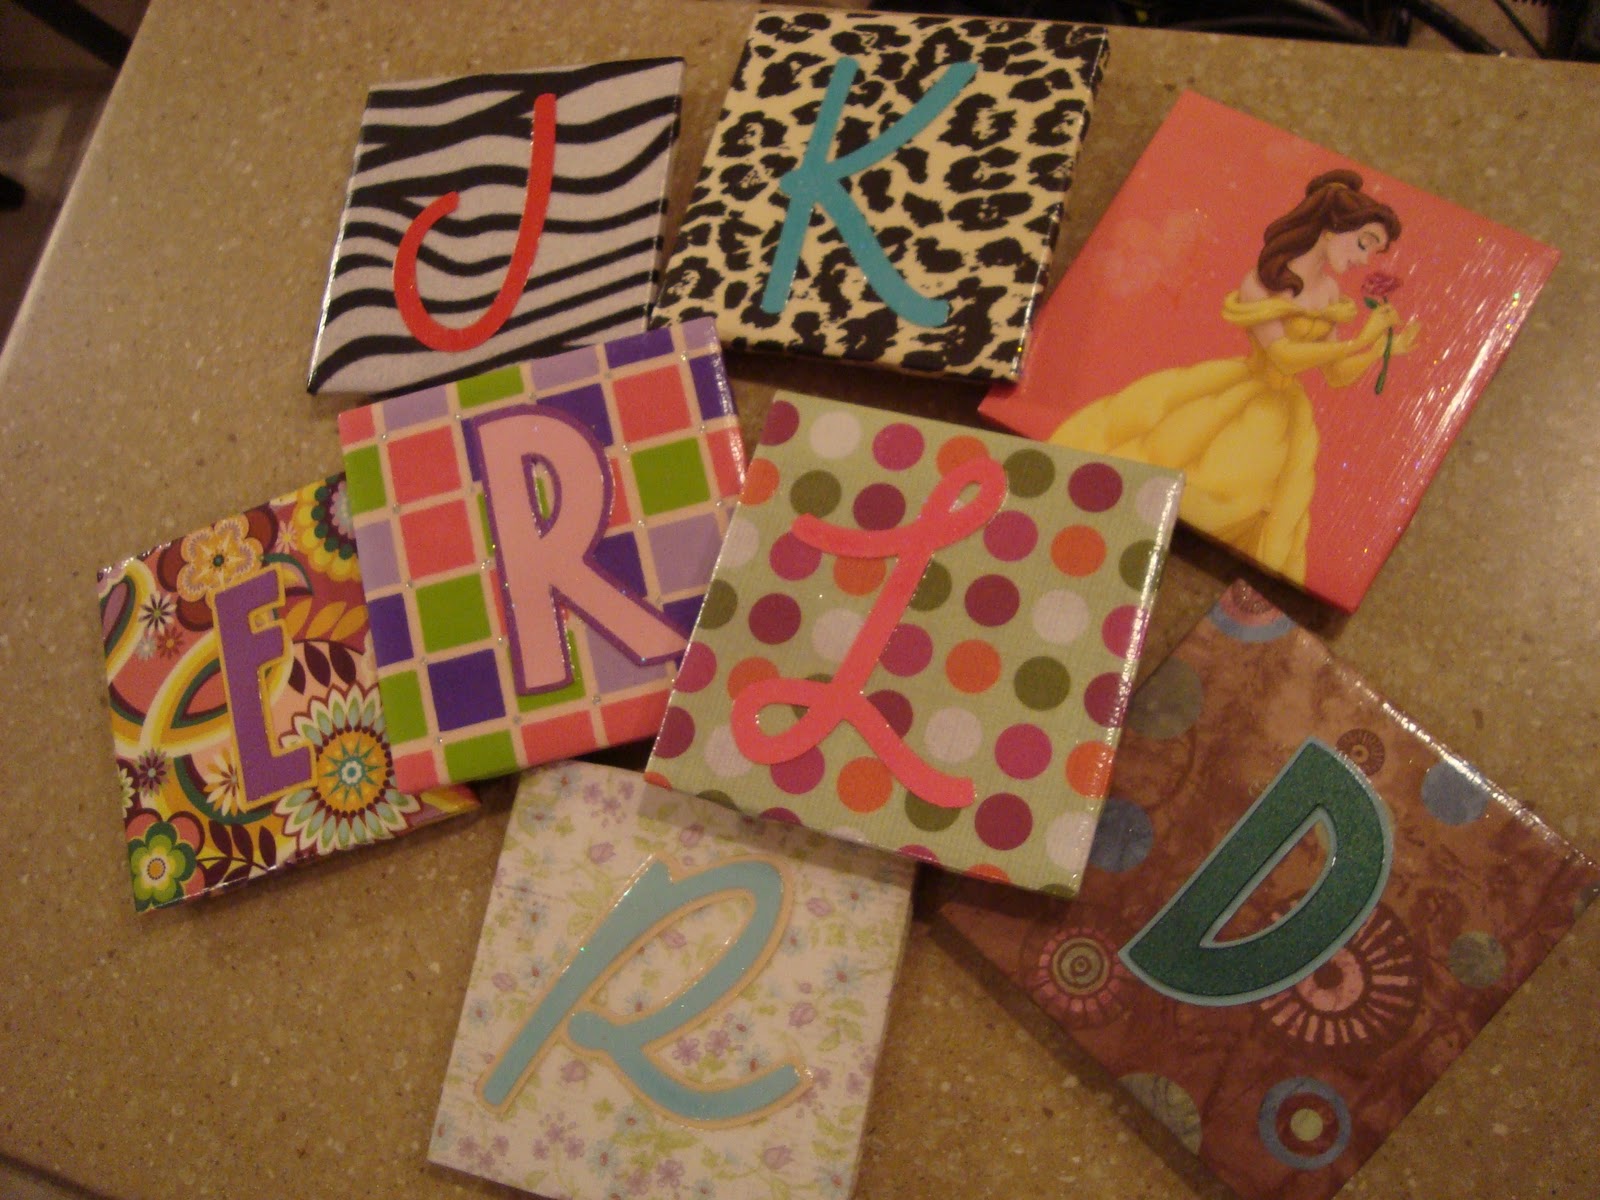
Here's a project that I've been wanting to do for quite some time--tile coasters! I made a set of 8 different ones--custom for each of the girls in the office at work to keep for their desk (or bring home!) as a small Christmas gift. There are MANY tutorials out there, so I combined a little steps of each to make my own. :)

Supplies:
4x4 Tile(s)
Corkboard or Foam
Paper
Paper Mod Podge
Spray Adhesive
Acrylic Spray
Brush-on Glue (optional)
Mod Podge Sparkle (optional)
Sponge brush/paint brush
Scissors
Patience!! :)

Step 1. To help protect your counter, desk or wherever your coaster will set, we'll use corkboard! Cut your corkboard to the desired size. I just used a pair of scissors, but I'm sure there are many ways to do this! Cut to either the exact 4x4 size of your tile, or a tad smaller so that your tile has on overhang. I chose option B where I cut them a tad smaller than the tile. 

Step 2. Get creative!! Are you doing coasters with a monogram, photo, patterned paper...? Design your coaster look! For my coasters, I chose to do a monogram with each girls first initial along with a patterned paper that reminded me of them. A very helpful tool for this was my Cricut! I used various colors and fonts to create the monograms. Also, cut out your "background" paper. Cut it just a tad larger than your 4x4 tile. (This is also when I used my Mod Podge Sparkle to add some bling to the letters!)


Step 3. Adhere the corkboard to the tile. First, apply spray adhesive to the cork--be carfeul, it IS messy! Optionally, apply a small amount of brush-on glue to the corners for extra support.  


Adhere the cork to the back center of the tile.

Step 4. Mod Podge time! Apply a good but smooth layer of Mod Podge to the top of the coaster and adhere your paper. Smooth the paper as best as you can with no ripples. Trim out the corners of the overhanging paper. (see below) Mod Podge the edges of the tile and fold the paper to adhere it to all sides.


Adhere your monogram! Apply a coat of Mod Podge over your paper and edges, then lay your letter on top. Let dry. Apply another coat of Mod Podge over the entire coaster. Let dry. Apply one last coat over everything. This is when patience is key. :) And don't worry--the Mod Podge will dry clear!


Step 5. Final step! Once the Mod Podge has completely dried, break out your acrylic spray. Follow the manufacturer's directions and apply a few coats to finish the coaster--this will give it a nice shine and serve as a final protective coat. 


Let dry and enjoy your final product! (Princess Belle is mine :)


I left each coaster on the girls desks at work with a little note that read:
"Here is a treat
For your cold (or hot!) drink feet
To help prevent a mess
From being made on your desk"

I was so glad that each girl was more excited and thankful for their gifts than I thought they would be!


I also made a set for a close family for Christmas. They loved it and it matches their kitchen perfectly!
For this set, I used a neutral color floral patterned scrapbook paper for the background with a centerpiece of a rooster image that I found and printed from online. 


I also plan to make a set (at some point in time!) for our own house using black and white photos of Larry and I, family and friends!<3

signature

Thursday, October 21, 2010

I'm 23!

My birthday was this past week and it was amazing! It fell on a work day, so I really thought it wasn't going to feel like my birthday, but boy was I wrong!! Look what I walked into when I get to work the morning of...

Isn't that awesome? So even if I didn't want people to know it was my birthday, I had no choice!! There was no hiding behind this decor! I was also lucky enough to have two former co-workers come in on their day off for lunch with me. I truly miss working with them and it was SO nice to have a relaxing (long) lunch. :)  

After having THE biggest chicken salad sandwich and a cup of soup, thinking that I wasn't going to eat until later in the night, out came the surprise dessert! This mousse type cake was HUGE! Look in the photo above and see how TALL it is! Even with the three of us, there was no way we were going to finish it. But it was YUMMY! :)
When I got back from my desk--a surprise smoothie!! My manager will randomly bring me smoothies, but my birthday deserved a SPECIAL one :)
 With just a few hours left of work, I was so excited to be off and enjoy my evening. But then, a delivery! One of the bellman came by my desk with some flowers. I had NO idea who they would be from, and then I read the card--from my mom. :) The card was SO sweet and the flowers are beautiful! Turns out she wanted to make sure my work day still felt like my birthday, and it definitely did! :)
 Once I got home, Larry surprised me with some more flowers! I LOVE the neon fun ones and they always seem to last forever :) 

That night for dinner we went to my parents house. After a yummy chicken meal I opened gits. Craft goodies of course! I was SO lucky and excited to get the tool accessories for my Cricut as well as the Jukebox! 
 The night didn't stop there...After already getting into bed after a LONG day of excitement, my roommate had me get up for gifts! I got THE cutest princess card, some air fresheners (which I needed!) an AWESOME Coach clutch and a bag of Reeses (my fave!)
 Even though she got me out of bed, I LOVED all of my goodies! Thank you Jamie! 
To celebrate my birthday, some of my closest friends joined me at Blue Martini Lounge. I love going there--not only do they have YUMMY drinks, but it gives everyone a chance to dress up! As a girl, I love dressing up, but the guys aren't usually too excited about it. I was glad they all willingly participated...the girls came home to get ready and all the guys were ironing their clothes singing "T-shirt time" from the Jersey Shore! It was too funny!

Right before going out I opened my gift from Larry--a gorgeous Juicy purse that I had wanted! And from my friends Autumn & Tommy--a beautiful white Victoria's Secret sweater!

We started off at Blue Martini with happy hour and stayed through the beginning of the night...we had a blast!!!
My love <3
 The ladies :)
The guys :) 
Very unexpectedly as there was no one on the dance floor, Larry asked me to dance <3 SO sweet!
 We were all alone enjoying a romantic dance until the guys decided to crash it :)
 We went to Chilis afterwards for some dinner. A friend got me this ridiculously fun balloon hat! And of course, to finish the night--dessert!! We all had a blast and I was so happy the night turned out perfectly!
The following day we had dinner with Larry's mom, brother and sister-in-law, my dad and dad's girlfriend and Larry's grandmother. It was her birthday that weekend so we had a joint birthday dinner at Olive Garden to celebrate. It was good to end the weekend with a nice, quiet family dinner. To top off the evening, more flowers from Larry's father--a bouquet of pink and white flowers, 
just like I had wanted! :) 

Later in the week, I had a visitor from a fellow friend & crafter, Katie from Sew Woodsy. She brought over some delicious homemade white cupcakes and some craft goodies. I got the Wild Card Cricut cartridge, which I am SO excited to use!! It is AMAZING! As well as some Mod Podge Gold Glitter that she scored for only a dolalr at the thrift store!! :)

I truly had an amazing birthday with great friends and family and am so thankful for everyone who made it so special! <3

signature

Wednesday, June 30, 2010

Happy Birthday to Mom Wells & Christina!

Today holds the birthday to two very special people! Larry's mother, April Wells and one of my best friends, Christina McElheney. 

I've known Larry's mom for over 8 years now. We have grown so close over the years...so close that when we are out together people think we are mother & daughter :) She is an incredible mother and wife and I love her very much!


I've know Christina for almost 6 years now (who's counting? haha)...We've stayed good friends throughout all of our up's and down's...and believe me, we've had many over the years! She is a good friend & I love her! 


Hope you both have a great birthday!!

**Update!!**
Here are photos of Jamie & I's secret project :) ...Mom Wells' birthday gift! We hand painted each of our names, as well as "Sun Kissed Beauty" onto pink metal beach buckets with Sharpie paint markers. We added some ribbon, glued on some crystals...and voila! It turned out super cute! We stuffed them with lei's and plastic shovels (for finding and collecting shells at the beach of course!) and filled her bucket with lots of girlie goodies...a candle, air freshener, body spray, loofa, soap, etc. We go on vacation to Longboat Key every year and never have anywhere to collect our shells other than plastic zip-locs!...This year we will be prepared :) We were so excited to give it all to her, and she LOVED it! 
 

I also made a tag and card with the help of my Cricut! :)


signature