Showing posts with label mod podge. Show all posts

Sunday, December 26, 2010

Custom Tile Coasters {Tutorial}

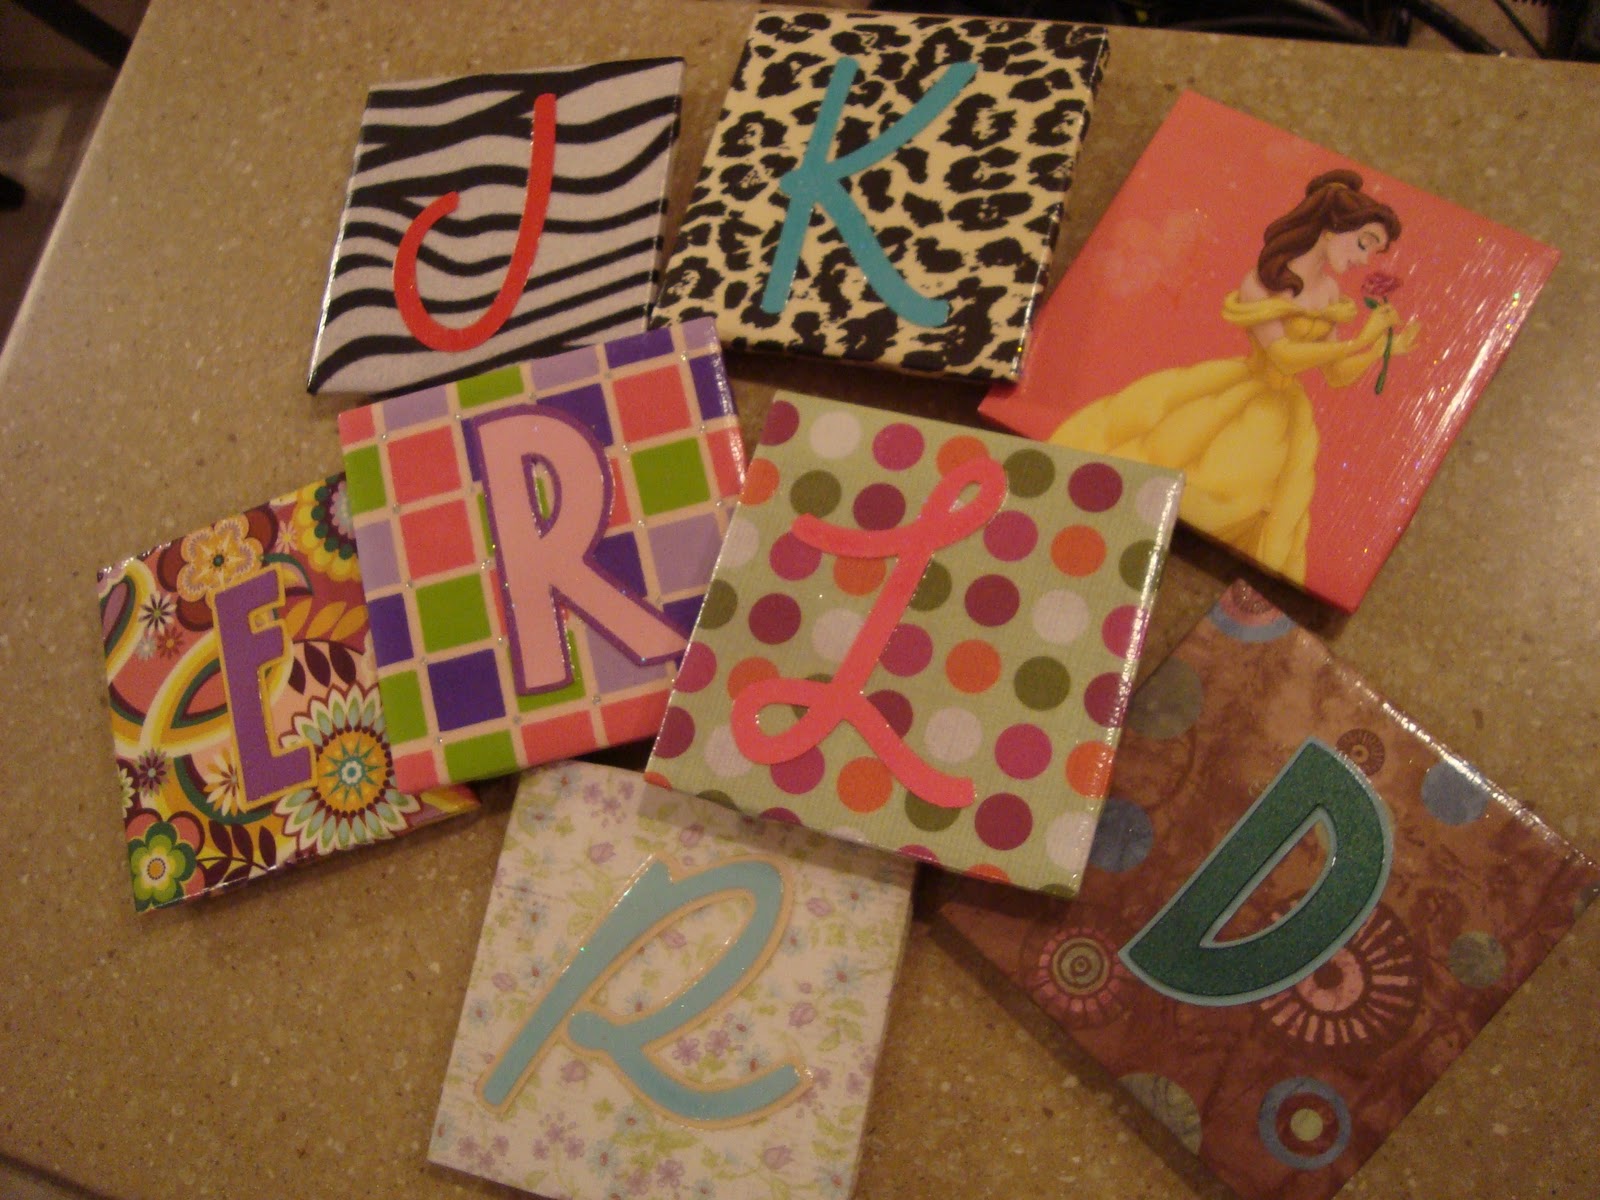
Here's a project that I've been wanting to do for quite some time--tile coasters! I made a set of 8 different ones--custom for each of the girls in the office at work to keep for their desk (or bring home!) as a small Christmas gift. There are MANY tutorials out there, so I combined a little steps of each to make my own. :)

Supplies:
4x4 Tile(s)
Corkboard or Foam
Paper
Paper Mod Podge
Spray Adhesive
Acrylic Spray
Brush-on Glue (optional)
Mod Podge Sparkle (optional)
Sponge brush/paint brush
Scissors
Patience!! :)

Step 1. To help protect your counter, desk or wherever your coaster will set, we'll use corkboard! Cut your corkboard to the desired size. I just used a pair of scissors, but I'm sure there are many ways to do this! Cut to either the exact 4x4 size of your tile, or a tad smaller so that your tile has on overhang. I chose option B where I cut them a tad smaller than the tile. 

Step 2. Get creative!! Are you doing coasters with a monogram, photo, patterned paper...? Design your coaster look! For my coasters, I chose to do a monogram with each girls first initial along with a patterned paper that reminded me of them. A very helpful tool for this was my Cricut! I used various colors and fonts to create the monograms. Also, cut out your "background" paper. Cut it just a tad larger than your 4x4 tile. (This is also when I used my Mod Podge Sparkle to add some bling to the letters!)


Step 3. Adhere the corkboard to the tile. First, apply spray adhesive to the cork--be carfeul, it IS messy! Optionally, apply a small amount of brush-on glue to the corners for extra support.  


Adhere the cork to the back center of the tile.

Step 4. Mod Podge time! Apply a good but smooth layer of Mod Podge to the top of the coaster and adhere your paper. Smooth the paper as best as you can with no ripples. Trim out the corners of the overhanging paper. (see below) Mod Podge the edges of the tile and fold the paper to adhere it to all sides.


Adhere your monogram! Apply a coat of Mod Podge over your paper and edges, then lay your letter on top. Let dry. Apply another coat of Mod Podge over the entire coaster. Let dry. Apply one last coat over everything. This is when patience is key. :) And don't worry--the Mod Podge will dry clear!


Step 5. Final step! Once the Mod Podge has completely dried, break out your acrylic spray. Follow the manufacturer's directions and apply a few coats to finish the coaster--this will give it a nice shine and serve as a final protective coat. 


Let dry and enjoy your final product! (Princess Belle is mine :)


I left each coaster on the girls desks at work with a little note that read:
"Here is a treat
For your cold (or hot!) drink feet
To help prevent a mess
From being made on your desk"

I was so glad that each girl was more excited and thankful for their gifts than I thought they would be!


I also made a set for a close family for Christmas. They loved it and it matches their kitchen perfectly!
For this set, I used a neutral color floral patterned scrapbook paper for the background with a centerpiece of a rooster image that I found and printed from online. 


I also plan to make a set (at some point in time!) for our own house using black and white photos of Larry and I, family and friends!<3

signature

Sunday, December 19, 2010

DIY Christmas Ornament

After much thought (and googling!) I decided on a technique for a DIY Christmas Ornament for my male manager. Keyword--male. That meant glitter, fun colors and bows could not be used! Which was harder than I thought...I knew I definitely wanted to include an old favorite basketball team logo and that was about it. I was open to any and all suggestions when finally I came across this technique at Mab Blab and fell in love. This is what I ended up with!


The idea for this technique is pretty simple. 
You remove the lid to the ornament--plop in your paint colors--cover the opening and swirl and shake!


I added the logo by printing out the image and adhering it with Paper Mod Podge. 


My manager ended up loving the gift and thought that I had originally purcahsed it--which is always a compliment. The idea is simple but the result is a clean look--and just the perfect fit for a guy!

Variations of this technique include using multiple colors and adding glitter. 
Every ornament made using this technique truly turns out to be one of a kind!

I also managed to sneak in a quick DIY T-Shirt with the same logo usinng a simple printable iron-on image of the teams logo. :)


Wednesday, October 6, 2010

Halloween Candy "Jar" {Tutorial}

I'm not too sure how many Halloween projects I am going to get to this year...for one reason, it's already October and I have SO many things going on this month, as I do every year. Work is VERY busy and very stressful these next few weeks. It is also my birthday as well as Larry and I's anniversary. So, that puts two weekends out of the picture! I also have a friend from work who wants custom accessories made for her cruise before the end of the month--that means LOTS of time sewing. We are also still working on the plans and finalizing things for the upcoming bachelorette party in the beginning of November. AND I am in charge of decor and department holiday parties, so that's a lot to organize and shop for! Not to mention I have to figure out WHAT to be for Halloween in time for the Halloween parties! Not to mention a few birthday gifts in between...I'm pretty sure I'm setting myself up for an anxiety attack! But, it's ok. I love doing it all!! :) BESIDES all that, my house is fairly small, so the main Halloween projects that I'll most likely focus on are things for the office. :)

So Halloween priority number one..candy! My first Halloween project was a candy jar for my desk. I wanted something fairly small--that way I wouldn't overload MYSELF on candy all month. I wanted nothing glass because I didn't want any accidental drops or slips off my desk--we are VERY safety aware in my company, so I'm being preventative :) And I know it's Halloween, but everything I make still has to be pretty and fun! SO, here is what I came up with.

All I used was:
Mod Podge Paper
Mod Podge Sparkle
Scissors/Paper Cutter
Ribbon
Patterned Paper
Paper Mache Box with lid


Step 1. Cut out your paper for every side of your box that you're going to cover and use a thin coat of Mod Podge to adhere it. I chose to break the main facing of the box into two horizontal pieces using two different patterned paper and a thin orange ribbon as a divider. The top green strips can only be seen when the lid is off...I did this because the lid's rim is covered with the same green paper. I then covered the green paper of the lid rim with a cute plaid ribbon and finished it off with a "Happy Halloween" paper on the top. All in all, I used 3 different patterned paper (but with 4 different looks, since I used the flip side of the paper for two of the four facing sides).   


Step 2. Let the Mod Podge dry!! I then did a thin coat of Mod Podge Sparkle over the entire box and lid! 


(I tried to get a picture of the sparkle, still can't figure out the best setting to do this with my camera!)


Step 3. Let THAT dry! Add any embellishments and you're done! I originally wanted to do a "gift bow" on top with all of my Halloween ribbon, but then I realized that my lid will probably be OFF most of the time so it would just be smushed!


It's so cute and perfect size for my desk!...and holds just the right amount of candy! :)


Tuesday, October 5, 2010

Bachelorette Party Invitations

I had the pleasure of working on the bachelorette party invitations for a fabulous lady from my previous job. We are planning an AWESOME full day of nothing but girl time. It's going to be a blast! Brainstorming on the cheapest route to make 25 invitations was pretty difficult--especially because the bride-to-be is such a fun and personable girl that I knew the invites couldn't be just plain old printed invites. Being on a budget didn't allow for much customization and flair either! But, with a little bit of card stock, Mod Podge Sparkle, Mod Podge Paper, and curling ribbon, this is what I came up with! :)

Such a simple but fun design. 
Using the various fonts made the card have a little bit more flair as well.


The colors for the party are purple, silver, white and black. I printed the text on white paper and Mod Podged it to the purple card stock. I then went over the wording with Mod Podge Sparkle. This is my new FAVORITE thing of all time! It adds just the right amount of bling to your project, which is PERFECT for the bride-to-be since she loves anything that sparkles! 

 (Sorry, the bling is really hard to catch on camera--and no the paper corners aren't coming off, 
that's just a bad angle with the sparkle and lighting!)

After folding in the corners, I used the prettiest curling ribbon and tied bows to secure the invites. 


Here they are!! Well, SOME of them anyway. There were 25 in total. While printing invitations would have been the EASIER (& possibly cheaper) route to go, this was still VERY cheap seeing as how I already owned the Mod Podge Paper  and white printer paper (all I had to purchase was the Mod Podge Sparkle and purple card stock--which was on sale 40% off!) All in all, I received many compliments on the invitations. I hope the bride-to-be loves them and we have a fabulous time celebrating before her big day!! :)

signature