Friday, July 23, 2010

Elastic Band High Waist Dress {Mini Tutorial}

Hello awesome new project and fabulous way to recycle clothing! 
My friend Katie introduced me to a great blog with this lovely dress tutorial... 
All we needed was an elastic band, old tank top and about 1.5 yards of fabric!
It didn't look difficult and is totally my style, so we decided to tackle it! We were really excited about getting this in the works because it looked so simple and comfortable! Finally, one Sunday morning we made a trip to Jo-Anns and purchased the supplies (I went a little overboard and bought enough to make a few!) and began sewing away at her house. 

We found the directions all in all to be fairly simple...the only thing we changed/added was that we removed the "gathering stitch" after stitching the skirt to the elastic band. We found that it was MUCH easier to put on over your head with this stitch taken out! I also decided to NOT stitch my tank onto the skirt. I LOVE the skirt as it is and the idea of being able to switch out different colored tanks for various looks is awesome. Plus, no one knows that it's NOT a dress once it's on! :)

Here is Katie's beautiful dress! She had an old green tank and paired it with the cutest green and pink floral fabric. She also added black lace on the neck of her tank to match the black elastic band. She said she has received many compliments when wearing it at work and that it looks adorable with a black cardigan! Super cute :) She is working on her second one as we speak!!

I also made a few adjustments on my own with the fullness of the skirt. My first attempt at using the suggested measurements (1 and 1/2 times the length of your waist, so mine was approximately 1.5yards) along with the stiffer cotton fabric made the skirt feel huge and really full (plus I'm not pregnant like the girl in the tutorial!) I adjusted this by taking in a few inches from the seam and added another two seams to make it less full. My second skirt was with a silkier material. This was the easiest, quickest and best fitting skirt of them all since I didn't have to adjust the measurements! The flowier fabric allowed it to gather and sit just right so it didn't look near as puffy. For my third skirt, I adjusted the original waist measurement to fit me almost snug, then added a triangle piece of fabric in the back for some wiggle room and fullness. All three ways worked fine and look awesome in the end! 

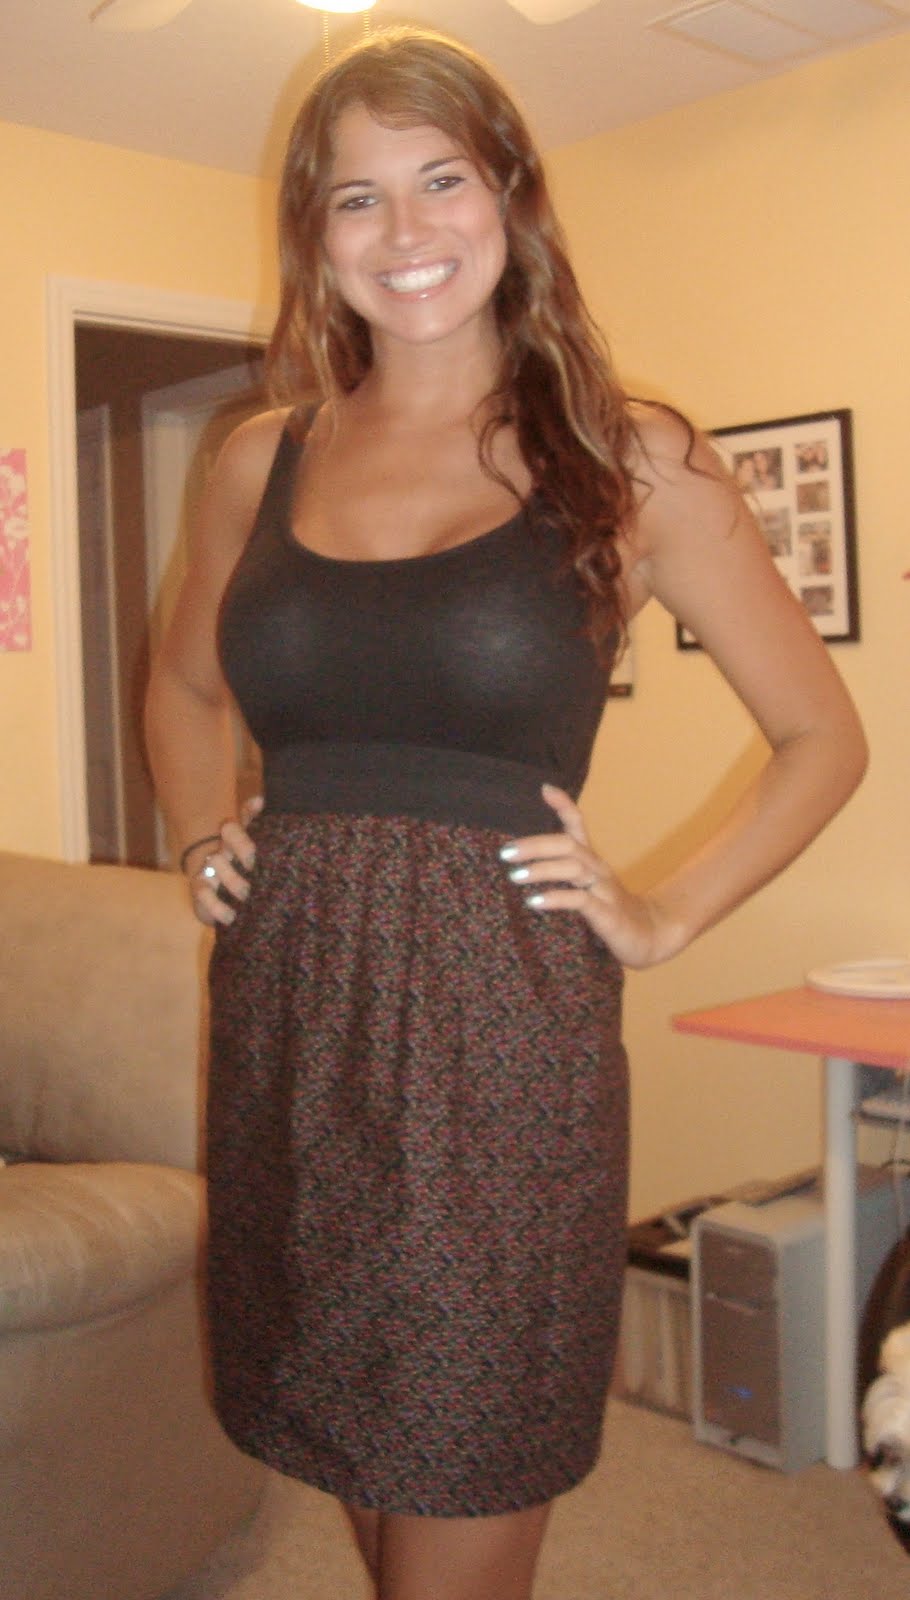
This was my first skirt! I used a black elastic with a black multi-colored tiny floral print fabric for the skirt. This is the one I had taken in and added two extra seams to. It's not so puffy anymore! :)  
I also made it a little shorter so it hits right below mid-thigh. 
See how cute it is to change out the tank top color! Completely different look!
This is my silkier skirt! It's perfect for the summer & beach. (I wore it in Longboat!) I also made this one a little shorter as well. I loved the fun fabric of yellow, pink and white...I've been eyeing it at Jo-Anns and am glad I found the perfect project for it!

This is my most recent skirt where I just added the extra triangular fabric in the back to a smaller measurement. It is a brown with floral print. It also has a little bit of gold glitter mixed in for extra sparkle! I have it paired with a white thinner elastic band (3/4") that I added a gold lace on top of. I also made a flower accessory with the scrap fabric and lace! 
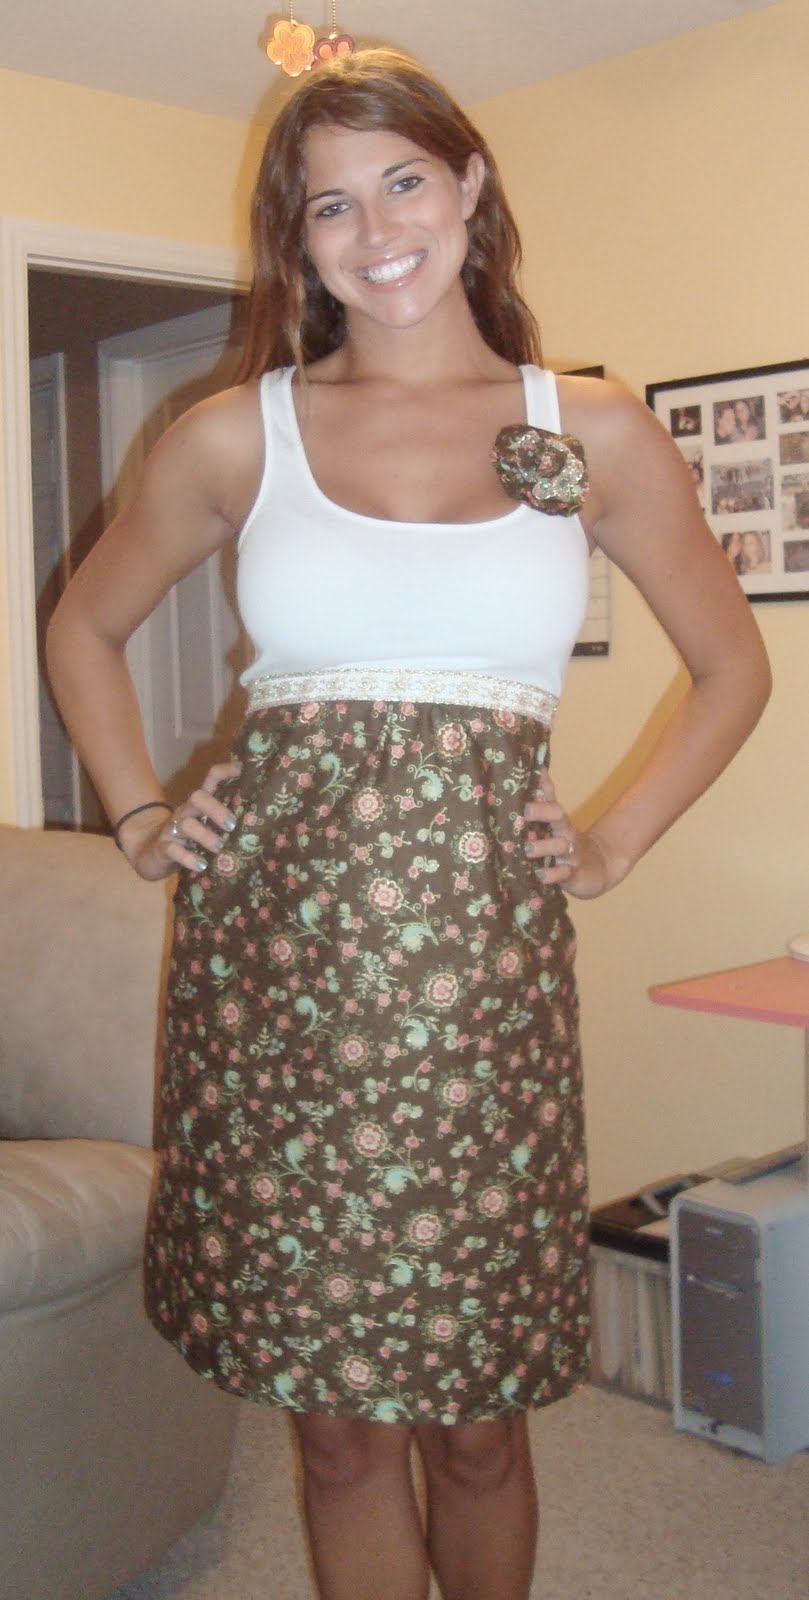
Up-close view of the flower on the shirt and in my hair. Also with a different color cami ;) You can kind of see the lace more in detail on the elastic band as well.

All in all this is a super easy and cute way to make a simple dress...or skirt! ;)
Thank you Katie for suggesting it and Smashed Peas & Carrots for sharing it with us!!


signature

Heaven on Earth :)

Last weekend my roommate, Jamie and I took a 2 hour drive to the west coast to visit Larry's parents in Longboat Key! I have been visiting here with them ever since their first trip in 2005--for 6 years now! This is truly heaven on Earth and our yearly getaway that we always look forward to. Here are a few photos from our trip :)
Crystal clear water and bright blue skies :) 
Larry's father invented the "Foot Flower"
Using our buckets we made for Mom to collect seashells!!!
We saw the beach candy at Publix and decided we had to make a beach cake!
Going to "the circle" to shop is one of our favorite things to do...We found a new sandwich shop where the owner literally spoiled us--free cookies, EXTRA ice cream & samples of a milkshake!
The sunsets are breathtaking...it's a must to watch them every night.


How Charming!
One mission while we were shopping at the circle was to find Longboat Key charms. I purchased matching charm bracelets for my roommate and I last year at Christmas, and we have been collecting charms ever since! We've received them from various family and friends, as well as each other as memorabilia for certain events or places that we go to. After searching store after store, no charms were really good enough to signify out Longboat Key! We had another plan of action...earrings! Take a pair of earrings and turn them into charms :) They would be matching and cheaper than buying individual charms! Still no luck with finding anything that said Longboat Key, BUT we did manage to come across  these SUPER cute crabs! Every year we always go out on the beach late at night searching for (more like running from!) the crabs. This year was the most memorable so far because Larry's dad actually caught one! It was too fun watching the many crabs run around while Dad Wells tried to catch them with his net! We thought the crabs were a perfect symbolism for Longboat :) 

Our new charms as earrings: Before
After!! :) How cute! Just add a jump ring and voila! 

My bracelet :) 
Friendship heart that Jamie has the other half to; a purse because I am obsessed! from Mom Wells; Minnie Mouse Jamie and I purchased for each other to signify all of our Disney trips; "Princess" form Mom Wells:) ; Crab from Longboat; "Key" West from our trip down south on Memorial Weekend; custom pink charm that I made (Jamie has a turquoise one)


signature

Thursday, July 15, 2010

PEACE & Love

After much trial and error, I finished my hipster purse! I started off planning to use a Simplicity pattern, but after cutting out the pattern pieces, I soon realized I definitely wanted something different. All in all I ended up using two rectangles, a smaller one for the front pocket and two longer rectangular strips for the straps and sides/bottom. I encased batting between the peace sign fabric and pink lining for sturdiness as well as in the strap. I made my own pink bias tape out of the lining and used it as an accent for the front pocket and top. I added a zipper to the main opening and a rhinestone peace sign iron-on to the lower front corner. I originally made the purse to take to theme parks, shopping, etc. but am finding that I use it way more often than that!


After cutting, shaping, pinning and more cutting, I was finally happy with this simple design!...I also found out with this project that I'd LOVE to own a bias making machine!...maybe one day! :) 

The other newest peace sign in my life is from Larry! He is learning more and more in the carpentry world and he surprised me one day after work with this awesome gift!!


It's a peace sign picture frame that he made all by himself :) 

I added some paint...

...and bling!


I LOVE it and I love you babe! Thank you so much!

signature

Tuesday, July 6, 2010

Garden of Anngela

Happy Belated 4th of July!! Our holiday weekend was unfortunately taken over by rain and clouds...so no exciting beach trips or lazy pool days, but we did still have some fun times with good friends :) One of the most exciting things was finally seeing Eclipse--I went with Jamie last night and it was awesome!! I am truly a Twilight/Jacob addict :) I love the books and seeing them come to life in the movies is always exciting!!
I also managed to slip in one DIY project the past two days...I have decided to try something VERY new to my world! Gardening :) Rather I should say...potted flowers. One kind for now inparticular...sunflowers!! A good friend from work Vanessa, picked up some sunflower, daisy and strawberry seeds and started a mini garden herself. After seeing the success she was having I was very excited for her! She gave me some of her extra sunflower seeds and I was anxious to get them growing. I made a trip to Wally World yesterday for a cheap planter and some Miracle Grow--because I'm pretty sure a miracle is what I'll need for them to grow! I have NEVER planted flowers or tried to grow anything on my own anytime recently...so this should be interesting and hopefully just as successful as Vanessa! 
But of course, I had to turn it into a project :)
This was the planter before I got my hands on it... 

I broke out my acrylic paints and brushes...
I started off by freehand drawing some simple flowers with a pencil. I then went over it with my paint in array of bright colors. I finally added some green dots and stripes for extra pizzazz...
I think it turned out super fun! 

Here is one side of the planter. 

The other. 


Hopefully I will see some pretty sunflowers in my future...if not, I will stick with just decorating the planters ;) Wish me luck! 


signature

Wednesday, June 30, 2010

Happy Birthday to Mom Wells & Christina!

Today holds the birthday to two very special people! Larry's mother, April Wells and one of my best friends, Christina McElheney. 

I've known Larry's mom for over 8 years now. We have grown so close over the years...so close that when we are out together people think we are mother & daughter :) She is an incredible mother and wife and I love her very much!


I've know Christina for almost 6 years now (who's counting? haha)...We've stayed good friends throughout all of our up's and down's...and believe me, we've had many over the years! She is a good friend & I love her! 


Hope you both have a great birthday!!

**Update!!**
Here are photos of Jamie & I's secret project :) ...Mom Wells' birthday gift! We hand painted each of our names, as well as "Sun Kissed Beauty" onto pink metal beach buckets with Sharpie paint markers. We added some ribbon, glued on some crystals...and voila! It turned out super cute! We stuffed them with lei's and plastic shovels (for finding and collecting shells at the beach of course!) and filled her bucket with lots of girlie goodies...a candle, air freshener, body spray, loofa, soap, etc. We go on vacation to Longboat Key every year and never have anywhere to collect our shells other than plastic zip-locs!...This year we will be prepared :) We were so excited to give it all to her, and she LOVED it! 
 

I also made a tag and card with the help of my Cricut! :)


signature

Monday, June 28, 2010

All Things Girly!

I've finally finished my first dress & I LOVE it! It's super girly and SO me! I used a simple strapless pattern with a satin-like floral fabric. It has a zip-up back and minimal boning on the sides for extra support. The length for most patterns are pretty long, for even the shorter dresses...so I adjusted this one and cut off a few inches. I made the custom ruffle detail on the front myself as well...it definitely added a girly touch :) 
Here is an up-close view of the fabric and back.

I can say after doing this one dress, it isn't too difficult and I'm sure there will be many more to come! 

Along with my dress I did a hair accessory :) It's definitely another girly touch to the dress! I really love any flowers, ribbons and bows for accessories...

I also made a flower out of extra fabric that I had from my yellow purse. I put a safety pin on the back of it and it makes a great accent for a shirt, purse or in my hair :)

My current sewing projects are a high-wasted skirt and crossover bag--if the bag turns out anything like I'm picturing, it's going to be awesome & super cute...I'm using pink glittered peace sign fabric and hot pink lining. My friend Katie and I are also going to hopefully get together and make a dress that we saw on a DIY blog she follows--we're super excited about it...it looks easy & really cute! 

Moving onto jewelry!
I fixed my Aunt Lori's bracelet for her...originally the toggle broke on one end, so I re-strung it and added a simple clasp. Hopefully it'll last a while now for her :) 

While at Jo-Anns digging through the clearance bin (where I always find amazing stuff!) I found the clasps that I have been searching for forever now it seems! Here they are :) 
Aren't they awesome?! They're oversized heart clasps and I LOVE them! I was so excited when I found them...if only I could find them in sterling silver now and I'll be in heaven!  

I had to make a bracelet right away using the clasp...it's very summery and I love the bright colors of the shells that I found. I also made a set of earrings to match. To continue the beachy theme, I used a three-strand framing for the earrings. This is the style that I learned when making my FIRST pair of earrings...thought I'd bring it back :) 
Here they are on :) A little big and fun for the summer!

I'm very excited for the rest of the week...Mom Wells and one of my best friends, Christina's birthday are on Wednesday and Dad Wells' birthday is on Saturday! We are going to the beach on Thursday to celebrate for Christina & at some point throughout the week we'll have a family dinner for mom & dad Wells :) At work we have a large party group coming in at the end of the week, so we are expected to be very busy Friday & Saturday!...last year I made really good money so I'm hoping for another round of that :) The girls and I at work will be celebrating the holiday by dressing up with some July 4th accessories...which is always fun! I'm actually off for the 4th of July & the 5th...I'm excited to see what we'll end up doing!

My Anthropologie flower project is coming along slowly...running into some minor problems, but in the end I know it will turn out great! Also, my roommate and I's secret project will soon be unveiled...yay!! :) 


signature