Showing posts with label sewing. Show all posts

Wednesday, October 26, 2011

Make Your Own: Fred & Wilma Costumes

Halloween is right around the corner so if you haven't purchased your costume yet and the racks seem to be getting a little bare, consider making a costume for yourself. I put together a couples costume for both Larry and I for a whopping $20!!


Here's the cost breakdown:
$10 on my white satin 'leopard print' fabric
$4 on my styrofoam balls
$4 on felt for the Fred costume
$2 on red lipstick
I already had elastic, ribbon, fishing line (or thread) and earring backs on hand
*Side note--all of my fabric was purchased at Jo-Anns. Coincidentally BOTH fabrics were marked down to half off and I had a 40% off a cut and a 50% off a cut coupon. Felt always seems to be 50% off and coupons come out on a weekly basis!

:How To:
Fred: After some googling I knew creating Fred would be easy. I made his entire costume from large pieces of felt. Simply create an over-sized extra long shirt with a fairly large hole for the neck. Cut up the edges for a torn effect. I cut a long piece of turquoise felt into the shape of a tie--a very OVERSIZED tie. Larry really wanted this piece to be dramatic. He tied it on like a real tie and I hand-stitched it on in a few places to make sure it was secure. Cutting out the black shapes was actually very simple; stitching them on was the most tedious part. I used my machine to create a few stitches on the corners of each of the spots rather than stitching around the entire piece of fabric. ALL DONE! 


Wilma: I was originally going to use a white knit material for Wilma's costume but when Larry spotted a satin 'leopard print' white fabric for a great price I couldn't pass it up. The downfall = it wasn't stretchy. I didn't want to go through the hassle of adding a zipper just for a halloween costume, so I made a simple one-sleeve design for my dress and added an elastic band below my bust for some shape. Here is a tutorial I skimmed over to get a jump-start on my dress design. I made MANY changes in my design compared to this one, but it was a good reference. The dress shouldn't have too much of a shape and should be just big enough to fit over your head to wear. Now, to create some shape! How to create an elastic waist: Sew a piece of ribbon (larger than your elastic) measured to the dress (not your waist) to the INSIDE of the dress just below your bust--edgestitch the top and bottom of the ribbon, leaving each end of the ribbon open, creating a casing for the elastic. Push the elastic through the ribbon casing using a safety pin, decide on how much stretch you like (making sure it can go over your head) and sew the elastic together on the ends. From here, adjust the gather around your waist and stitch over the dress, elastic and ribbon casing along both side seems to keep the gather even and the elastic from rolling. Cut up the hem of your dress and you have a Wilma!!


Strand your styrofoam balls onto some fishing line (or thread) with a needle and glue two balls onto earring backs...add some red lipstick and you're good to go! An orange wig would totally complete the look, but that was the one splurge I wasn't willing to make. :)


Hope this might inspire you to make your own costume for this coming Halloween!

Need other ideas for a DIY costume? 
Check out my $5 mini poodle skirt, lace masquerade mask or Sew Woodsy's mad scientist costumes!


signature

Tuesday, July 26, 2011

Baby Onesie Dress and Headband {Tutorial}


Another baby girl is on her way--a friend is expecting her little one in less than 2 weeks now! Unfortunately I was unable to attend her baby shower and missed the fun and games, but still gave her a few handmade gifts for baby Fayelyn. Using the same tutorial from Running With Scissors as I did for the onesies in this post I made a custom dress and matching headband from some girly vintage fabric.


The headband was a first-time creation and it turned out better than planned! Since I had no 'baby headbands' on had, I created a cloth casing from the matching pink & white fabric and inserted a piece of elastic. After googling I came to a common measurement of 12-13" for the headband with it being able to stretch to approximately 16" for a 6-9 month baby size.I made a simple fabric rosette and centered it with a pearl button and attached it to the headband using a felt backing and hot glue. One of the easiest projects to date and it turned out darling!


Along with her onesie, I made a picture frame to match her nursery.
HOW TO make frame: I painted a wooden frame with 2 layers of pink acrylic paint, sealed it with a layer of Mod Podge, glued on ribbon, a matching handmade bow, a few pearl and crystal embellishments along with matching epoxy letter stickers.


We can't wait to meet baby Fayelyn!

signature

Thursday, July 7, 2011

A Very Simple Strapless Dress {Mini Tutorial}

One of my latest tutorial finds was this super cute ‘Simple Skirt’ from Katy at Sweet Verbena. I stumbled across her blog via Pinterest and though she is fairly new to the blog world she has some adorable and amazing tutorials. Her style is awesome and her projects are simple and fun. In addition to making a ‘Simple Skirt’ I also used the same idea from her tutorial to create my most recent dress--meet the Simple Strapless Dress! 

This was a learn-as-I-go sewing project for myself. I’ll try to explain as best I can the steps I took and adjustments I made to the skirt tutorial. Once you review and understand Katy's skirt, this should be a breeze for you to make!


Here is what I used:
1 and 2/3 yard of 45” wide fabric
1” wide elastic
Sewing Essentials

((Please bare with me as it may get a little wordy since I don't have photos of the steps I took; for reference please visit Katy's tutorial as she took very helpful photos of each step!))

For the first step, rather than folding your fabric completely in half lengthwise to create a 2-layer skirt as Katy did, fold down your top edge roughly between ¼ -½ way down your fabric. To get a more accurate measurement of how far you should fold your fabric, measure the height of your bust. Do this by measuring from the top of your chest (or the bottom of your armpit--where the dress will sit) to directly under your bust. Add about 2 inches to that measurement and fold your fabric.

Since your bust measurement is longer than what the equivalent measurement of your back would be, cut your folded fabric with a slight curved edge working from the center to the ends. This will help eliminate any excess fabric or poofiness on your back.

Here is my pitiful attempt at creating a diagram to describe this:
The faint gray line is where your fabric is folded over to and the black curved line is what you will cut out from your flap
Create your casing at the top of the fold just as Katy did. Do this by laying down your elastic across the top of the fold and pin directly underneath it. Sew a straight line where you just pinned. Here is your first casing!

This is when Katy slides in her elastic, gathers the skirt and sews up the two sides to finish her skirt--super simple!! To create my dress, we will add one more step so that we can create the casing for the second elastic around your waist.

Leaving about an inch seam allowance, sew a line along the bottom of your curved fabric flap. Lay your elastic as best you can around the curve and pin on top of the elastic (same idea as the first casing) and sew along that pinned line. Your two slightly curved sewn lines create the casing for your second elastic.

Here is another lame attempt at a diagram:
The two grey dashed lines are where you sew to form your casing
Measure your elastic to where one piece fits comfortably around your upper chest and another piece around your waist. Be sure to have enough slack to stretch over your head but enough tightness to hold up your dress. Insert your pieces of elastic through the casings using a safety pin (or whatever works best for you!) and pin the elastic to each open end. Stretch both of your elastics and play with the fabric to get a nice even gather. Hem the bottom of your dress (if needed). Pin the two edges together, right sides facing each other, and try on your dress if you’d like. Make any adjustments to your elastic at this time. Once fitted, sew straight down the edges to form your dress and you’re all done! **You'll notice that one key difference from the skirt was that my one seam is worn at the back of my dress, rather than at the sides.

Add a belt for a little more shape if you'd like!


If you have ANY questions at all in regards to making a dress of your own, please do not hesitate to contact me!

Thank you Katie from Sew Woodsy, Danielle from Blissful & Domestic and Kelly from Running with Glitter for featuring my dress!!

signature

Friday, May 27, 2011

Handheld Friends, Part 2 {Clutch & Purse Tutorials}

More clutches and purses?! Yes, please!!
Here are a few more (with their tutorials) that I have made as gifts for family. 

My grandmother and Larry's mom both complimented one of my first clutches that I had made for myself a while ago...Though she was one of my first clutches, I still use her frequently--the button and contrasting inner lining are my favorite features. Here she is!


My grandmother requested one in a black and white and red color palette for when she goes square dancing. I had just the perfect fabric for this! 
I also made a red/black/white bracelet and stuck it inside of the purse for her. :)
I unfortunately wasn't able to get a photo of her actual clutch--but this one was made from the same fabric that I had used for her's--hers was a little larger, had a red stripe on the front, a longer wrist strap and pocket on the inside.


 Larry's mother also complimented the clutch, but since she's the use-one-purse-until-it-falls-apart kind of lady, I was nervous she would love the fact that I made it for her but maybe not put it to use. Nonetheless I had to make her one! She loves the color purple. I found an amazing floral print that complimented a gorgeous purple sparkle fabric that I knew I wanted to use for her.


Inside has a pocket for her ID, cards and cash

Larry's mom and her clutch! She uses it frequently when visiting the Hard Rock Casino, movies and mall! YAY!

I used the good old gathered cluch tutorial from Anna (with a few variations) to create all of the clutches above.


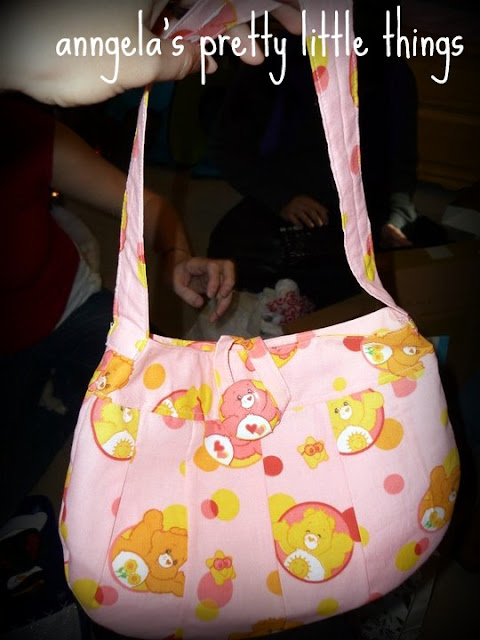
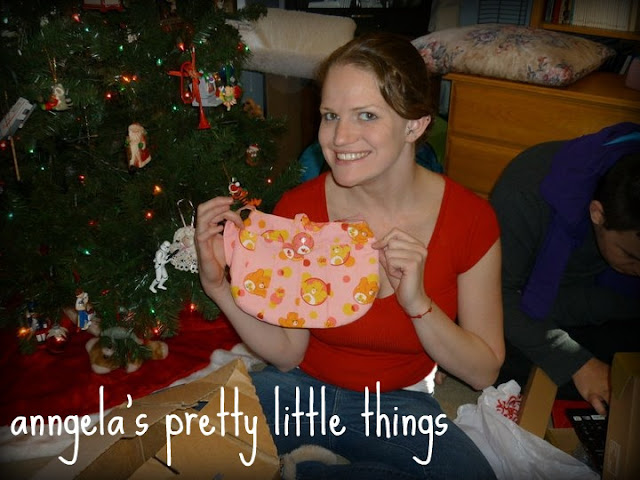
I also made a purse for my sister. She had an old Care Bear sheet set that she had been wanting a purse made out of by my mom for many many years now! My mom passed on the task to me, so I used this past Christmas as an opportunity to make her one. I used the infamous Made-by-Rae Buttercup Bag pattern and tutorial for the first time and LOVED it! I've been wanting to make this purse for quite some time--I as pleased, it is fairly simple and turned out super adorable! I didn't use a heaver fabric for the lining, so I added a fusible interfacing to help give it some shape though next time I think I will try and use a heavier fabric when I'm not subjected to matching a Care Bear pattern. :) Also, instead of a magnetic closure, I used a fabric-button that I made out of the matching Care Bear fabric.


Tia with her new purse--she was very excited to see her Care Bear purse finally come to life!

Glad to share a few more of my purses and clutches--more to come sooner or later! :)


signature

Friday, May 20, 2011

Fabric Flower Belt {Mini Tutorial}

As promised, here is the mini-tutorial for the matching belt to my latest one shoulder summer dress! This is a SUPER quick and easy accessory you can add to any outfit!


::Supplies::
Belt Fabric (I used a suede)
Flower Fabric (I used a stretch knit--the same fabric as my dress)
Small piece of Velcro
Hot Glue
Scrap Fabric
Safety Pin
Sewing essentials (machine, thread and scissors)

The fabric I chose for my belt was a brown light-suede. I wanted to be able to add an accessory that would allow me to wear brown wedges or heels with my dress rather than just a lighter pair of shoes. My flower was made from the same material as my dress--a stretch knit.

First step: Measure your waist (or where you want your belt to sit). I wanted mine to hit right below my chest--the smallest part of my torso. Add about 3 inches to that for finishing and overlapping. Also, decide how wide you want your belt to be. My finished belt is about 2" wide. Cut a strip of fabric the length of your waist measurement (with the extra 3 inches) and 2.5 times the width that you want your belt to be. (For a 2" belt like mine, cut your strip about 4.5 inches wide)

Second step: Sew! Face your fabric right sides together and pin along the edges to keep the fabric straight, if necessary. Sew a straight line down your belt from end to end creating a tube. Trim off your excess seam allowance.


Try to cut your fabric straighter than I did :)
 Third step: Turn your belt ride side out and press flat with the seam in the center. Sew a top stitch at both the top and bottom of your belt for a finished look and to keep the belts shape. The center seam will be the back side of the belt.

Front side of your belt with top stitches
Back side of your belt with top stitches and center seam


Fourth step: Turn in both of your ends and sew the openings shut. When determining how much to turn in, make sure that the belt fits snug but still has some extra length for overlapping to add the velcro (that's where the extra 3 inches comes into play). Once sewn shut, sew on your velcro at the overlap by making sure one piece is on the "top" side of the belt and the other is on the "bottom" side of the belt so that they adhere when you put it on. Your belt is done!


Fifth step: Make your flower. I used the ruffle flower technique. After I made my flower, I hot glued a piece of scrap white fabric that I cut into a circle to the back of the flower to secure the shape. I then glued a smaller extra piece of fabric to the back that I could slide my safety pin into--only glue the ends of the small strip so the pin can slide through it. Slide your safety pin onto the flower, pin it to your belt and you're done!

I wore my belt to where the velcro was in the front and the flower was pinned directly over the velcro. It would be cute to off-center your flower as well (just not as cute with my one shoulder dress--too much asymmetry going on) ;)

The fact that the flower is safety-pinned and can be removed allows for your belt to be worn solid or with any other accessory attachments. :) I think a solid ruffle flower would look nice with my dress as well!

 Enjoy your new belt!!

signature