Friday, May 27, 2011

Handheld Friends, Part 2 {Clutch & Purse Tutorials}

More clutches and purses?! Yes, please!!
Here are a few more (with their tutorials) that I have made as gifts for family. 

My grandmother and Larry's mom both complimented one of my first clutches that I had made for myself a while ago...Though she was one of my first clutches, I still use her frequently--the button and contrasting inner lining are my favorite features. Here she is!


My grandmother requested one in a black and white and red color palette for when she goes square dancing. I had just the perfect fabric for this! 
I also made a red/black/white bracelet and stuck it inside of the purse for her. :)
I unfortunately wasn't able to get a photo of her actual clutch--but this one was made from the same fabric that I had used for her's--hers was a little larger, had a red stripe on the front, a longer wrist strap and pocket on the inside.


 Larry's mother also complimented the clutch, but since she's the use-one-purse-until-it-falls-apart kind of lady, I was nervous she would love the fact that I made it for her but maybe not put it to use. Nonetheless I had to make her one! She loves the color purple. I found an amazing floral print that complimented a gorgeous purple sparkle fabric that I knew I wanted to use for her.


Inside has a pocket for her ID, cards and cash

Larry's mom and her clutch! She uses it frequently when visiting the Hard Rock Casino, movies and mall! YAY!

I used the good old gathered cluch tutorial from Anna (with a few variations) to create all of the clutches above.


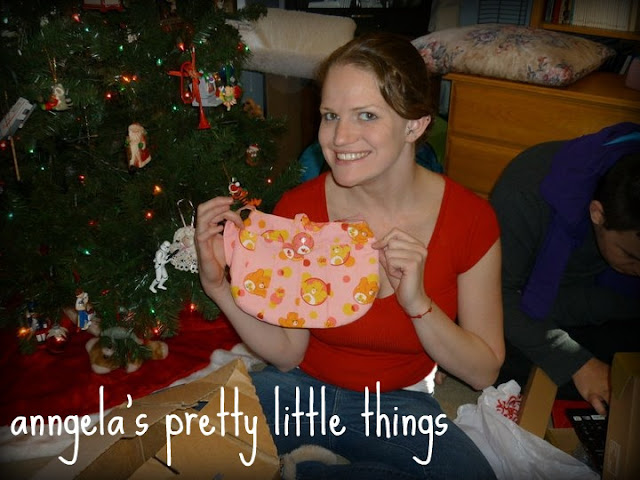
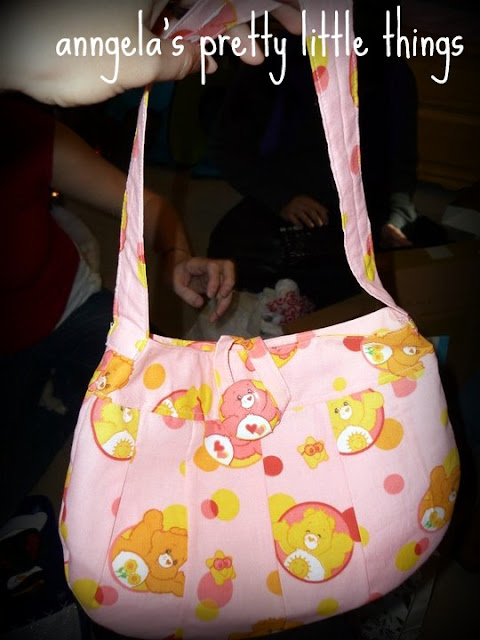
I also made a purse for my sister. She had an old Care Bear sheet set that she had been wanting a purse made out of by my mom for many many years now! My mom passed on the task to me, so I used this past Christmas as an opportunity to make her one. I used the infamous Made-by-Rae Buttercup Bag pattern and tutorial for the first time and LOVED it! I've been wanting to make this purse for quite some time--I as pleased, it is fairly simple and turned out super adorable! I didn't use a heaver fabric for the lining, so I added a fusible interfacing to help give it some shape though next time I think I will try and use a heavier fabric when I'm not subjected to matching a Care Bear pattern. :) Also, instead of a magnetic closure, I used a fabric-button that I made out of the matching Care Bear fabric.


Tia with her new purse--she was very excited to see her Care Bear purse finally come to life!

Glad to share a few more of my purses and clutches--more to come sooner or later! :)


signature

Monday, May 23, 2011

Ribbons and Pearls Jewelry Set {Mini Tutorial}

I posted the tutorial for the green pearl ring I gave to my friend Lisette for her birthday here. She loved it so much she wanted me to make another set out of purple pearls to be used for a good friends birthday gift! It is very similar to the green one but with a little added bling--and it has matching earrings rather than a bracelet.


With the leftover pearls I decided to make a jewelry set for myself since besides my charms that I turned into a necklace, I haven't made any new jewelry for myself in a while. Here is what I came up with!
 

I first started with the necklace. I knew I wanted to create that floating-pearl-on-a-long-chain-look but about halfway through I remembered Disney's J.Crew inspired necklace post off my 'Someday Crafts' list and thought that it would be the perfect time to make it--I just love the bows, they are my favorite part of the necklace!...I knew I had everything I needed already on hand and after searching many boxes for the perfect matching ribbon I got to making my set.

::Supplies::
Necklace
Chain
Pearls
Ribbon
Eyepins
Crimp bead covers OR clasp

Bracelet
Pearls
Jewelry stretch cord
Ribbon

Earrings
Headpins
Ribbon
 Earwires

Also a pair of needle nose pliers, wire cutters, a handy bottle of super glue and a lighter 
(don't forget to singe all of your ribbon ends so they don't fray please!)

Disney did a FABULOUS job giving details of the various supplies and directions for making the necklace. If you're a beginner jewelry-maker, please read this! She has fabulous details and pictures in reference to the supplies and tools. For my necklace, the only difference was that I used less pearls and a thinner ribbon--I also secured my bows with a few dabs of super glue rather than a needle and thread. I also used the matching ribbon for the closure of the necklace rather than a clasp attached to the chain. To do this, simply knot a strand of ribbon to each end of your chain. Use a crimp bead cover to hide your knot. Simply tie the ribbon around your neck to wear the necklace!


For the bracelet:

This one is the easiest! Cut a piece of stretch jewelry cord the length of your wrist plus a good 3-4 inches for room to strand your pearls and tie a knot. Strand your pearls onto the cord. Make sure to have enough pearls to where the bracelet is snug, but not too tight. I used a square knot to tie the cord. Trim your strands and tie on a bow with your ribbon for looks. :)


For the earrings:
Strand a pearl to the bottom of your headpin. Create a loop with your needle nose pliers and trim off the excess wire (the same as Disney does with her pearls on her necklace). Open your loop and strand the pearl onto your earwire. All that's left is to add the bow...I'm not going to lie, doing this took the most time out of the entire set! Tie a bow around the loop you made from your headpin rather than onto the earwire. This will allow for the bow to sway with the pearl while still facing forward. Once you have the PERFECT bow tied, get your super glue and dab some on the back, front and all around your bow to hold it in place! :) All done!


I am beyond pleased with how simple this was, fast it took to make and great it came out!
I bet you'll think twice about purchasing that $30+ set similar to this at Express, Anthro or NY&Co. since you can make one of your own in only 30 minutes! :)


Thanks Rebecca for featuring my jewelry set on My Girlish Whims!!

signature

Friday, May 20, 2011

Fabric Flower Belt {Mini Tutorial}

As promised, here is the mini-tutorial for the matching belt to my latest one shoulder summer dress! This is a SUPER quick and easy accessory you can add to any outfit!


::Supplies::
Belt Fabric (I used a suede)
Flower Fabric (I used a stretch knit--the same fabric as my dress)
Small piece of Velcro
Hot Glue
Scrap Fabric
Safety Pin
Sewing essentials (machine, thread and scissors)

The fabric I chose for my belt was a brown light-suede. I wanted to be able to add an accessory that would allow me to wear brown wedges or heels with my dress rather than just a lighter pair of shoes. My flower was made from the same material as my dress--a stretch knit.

First step: Measure your waist (or where you want your belt to sit). I wanted mine to hit right below my chest--the smallest part of my torso. Add about 3 inches to that for finishing and overlapping. Also, decide how wide you want your belt to be. My finished belt is about 2" wide. Cut a strip of fabric the length of your waist measurement (with the extra 3 inches) and 2.5 times the width that you want your belt to be. (For a 2" belt like mine, cut your strip about 4.5 inches wide)

Second step: Sew! Face your fabric right sides together and pin along the edges to keep the fabric straight, if necessary. Sew a straight line down your belt from end to end creating a tube. Trim off your excess seam allowance.


Try to cut your fabric straighter than I did :)
 Third step: Turn your belt ride side out and press flat with the seam in the center. Sew a top stitch at both the top and bottom of your belt for a finished look and to keep the belts shape. The center seam will be the back side of the belt.

Front side of your belt with top stitches
Back side of your belt with top stitches and center seam


Fourth step: Turn in both of your ends and sew the openings shut. When determining how much to turn in, make sure that the belt fits snug but still has some extra length for overlapping to add the velcro (that's where the extra 3 inches comes into play). Once sewn shut, sew on your velcro at the overlap by making sure one piece is on the "top" side of the belt and the other is on the "bottom" side of the belt so that they adhere when you put it on. Your belt is done!


Fifth step: Make your flower. I used the ruffle flower technique. After I made my flower, I hot glued a piece of scrap white fabric that I cut into a circle to the back of the flower to secure the shape. I then glued a smaller extra piece of fabric to the back that I could slide my safety pin into--only glue the ends of the small strip so the pin can slide through it. Slide your safety pin onto the flower, pin it to your belt and you're done!

I wore my belt to where the velcro was in the front and the flower was pinned directly over the velcro. It would be cute to off-center your flower as well (just not as cute with my one shoulder dress--too much asymmetry going on) ;)

The fact that the flower is safety-pinned and can be removed allows for your belt to be worn solid or with any other accessory attachments. :) I think a solid ruffle flower would look nice with my dress as well!

 Enjoy your new belt!!

signature

Wednesday, May 18, 2011

One Shoulder Summer Dress {Mini Tutorial}

One day last week I had the sudden urge to attempt my first dress without a pattern or tutorial from blogworld. I cancelled my daily gym plans to go straight home and sew! I knew exactly what fabric I had wanted to use. I decided on a one sleeve tank style--perfect for summertime. Here is my rather successful attempt at creating this dress--I will break down the basic steps I took to make her.


My fabric came from Larry's grandmother. I had known that I wanted to make a dress with it from the first day I got it...I loved the colors and with it being a stretch jersey I knew it would be a little easier to work with when fitting myself. There was about 2 yards that I had to work with--plenty! Since I didn't want to use a tutorial from online or a purchased pattern (which are more of a headache than help sometimes!) I grabbed a one-sleeve dress that I already owned and that had about the same stretch as the fabric I was working with.
Hello perfect dress that I want to re-create :)


The first step was cutting my fabric. I folded the fabric in half (making sure that the fabric stretch was going horizontally) right sides together and laid my dress on top of it. I made sure everything was laying flat, pinned my dress to the fabric and then cut around the shape of the dress leaving a HUGE (this is an understatement) seam allowance...just to be sure of course. You can always cut excess fabric off, but you can't add it back on!

Bailey pouting from not being aloud to play on the fabric

See my huge seam allowance!


The black lines are where I pinned the shape of the dress
I removed the pins that were securing my dress to the fabric and used them (along with lots more) to form the shape of the dress on my fabric by pinning around the entire dress, following all the curves. I then tried her on inside out just to see the fit. It was like a glove! Either I had traced the dress perfectly or the fabric really liked me...either way, I was very happy!

I then took her off and sewed up both the side seams, following the shape of the pins, still with a huge seam allowance. I also sewed across the top shoulder. The basic shape was done! I tried her on one more time for good measures before completing the last few steps.

Trying the dress on inside out!

(I apologize but from here on out I didn't take anymore photos--if you have any questions, please let me know and I'd be happy to answer them!! Only 3 more steps to go!)

This next step is when I typically would have used googled. For those of you who need them, there are many, many,many how-to-make bias tape tutorials but, since Larry's grandmother was over for the start of my dress I had her briefly re-fresh me on how to make my own. I have created bias tape in the past for accessories but have never sewn it onto a garmet. Since this was for a dress--it had curves and I would be wearing it regularly--I figured I would attempt it the correct way! It wasn't too bad! Since I was working with a jersey that wouldn't hold a pressed fold too well, I skipped the ironing part and just went for the sew-on! After lots of pinning, sewing, folding, re-pinning and re-sewing I had both of my "armholes" complete! This process didn't take near as long as I had thought it would...thankfully!

My next step was finishing the raw edges on the inside of my dress. Remember my ridiculously large seam allowances? I chopped off almost 2 inches from each seam and did a zig-zag stitch right at the edge to keep the inside from fraying.

I wanted the dress to be fairly long so that I could wear it for numerous occasions. Plus, over time if I wanted it shorter, I could just adjust the hem. So for now, she hits right at my knees. Complete your final step--the hem, and you're done! I am beyond pleased with the results!


This was surprisingly a quick, one-nighter, done in less than 3 hours project--and a new dress for my summer wardrobe?? Yes please!! I see many more of these in my future!!


*Stay tuned for a mini tutorial on how I made the matching belt! :)*

Now go grab a dress from your closet that you love and make one of your own!

signature

Monday, May 9, 2011

Roll-Up Accessory Case {Tutorial} and Mother's Day Weekend!

This weekend I participated in Katie from Sew Woodsy's

The task at hand for this party--a roll-up accessories case! After a few snacks and conversation, we got to sewing. House Party supplied the directions, fabric and thread as well as some freebies while Katie hosted and gave step-by-step directions. Here are a few photos from Sew Woodsy's house party re-cap post.
PS: Katie is also giving away a Singer Sewing Prize Pack from the various house party items and coupons she received--head on over there to enter and have a chance to win some goodies!

Sarah from While They Snooze came to the party! 

I'm diligently sewing my pockets :)

 
Vanessa and I getting our sew on

The roll-up accessory case was meant to be a fairly simple project--and that it was! This is a PERFECT project for any beginner sewer. I planned to use mine for my make-up brushes but the versatility and customizations for this project are endless. This has been a project on my "craft to do" list for quite some time--so this allowed for one more project to be checked off as complete!

:Supplies:
Two pieces of fabric
(we used 12"x14" but you can use any rectangular size--
step 3 explains how you may want to determine your size)
Coordinating Ribbon (approximately 20"-24" in length; longer if you make a larger case)
Sewing basics (machine, thread, pins, iron, etc.)

Step 1. Pin your fabric right sides facing together along the edges. Sew along the edge of the fabric with a small seam allowance. Be sure to leave a 4" gap in the center of one of your your longest edges for turning.


Step 2. Turn the fabric right side out, poke out corners and press.


Step 3. To make the pocket: Lay your fabric so that the long side that has the 4" opening is on the right. Decide how "long" of pockets you want and fold your rectangle from the bottom up. The folded part will be your pocket. Press your fold.

The long white line is where the top of my pocket is folded to--a little less than half-way up

Step 4. Open your fold and topstich the top of your pocket for a finished look. (Be sure to not stitch your pocket to the case--this is just a decorative step)

Step 5. Re-fold your flap. Now it's time to sew your individual pocket channels: Determine the channel widths depending on what you're going to hold in your case. I did mine a variety of 1/2"-2" inch pockets for my various sized make-up brushes. Use either a straight stitch or a decorative stitch to give it flair! You may sew only to the top of the pocket, or you may sew up the entire case--I chose to stop at the top of the pocket. Sew your channels by starting at the bottom of the pocket and working towards the top edge, reinforcing at the beginning and end or your stitch. (see photo below) *Do not sew shut your end pockets*


Notice end pocket is not sewn shut


Step 6. Final step! Fold your ribbin in half and insert the folded end into the 4" opening. This should be directly to the right of your pocket. (see photo below)


Stitch around your entire perimeter of your case--closing the gap and securing the open pocket ends--and you're done!


The various cases made by the girls at the party


Holding my make-up brushes and necessities


It matches my make-up case perfectly


Enjoy your new case!

Thank you Bree for featuring my case and blog on Coupons on Caffeine!
Thank you Valeria for featuring my case on Occassionally Crafty!

Thank you Jen for featuring my post on the fabulous Classy Cosmetics! If you need any make-up ideas or inspiration, check her out!!

::Mother's Day::

Prior to Mother's Day I made an invitation asking my mother and Larry's mother to brunch and pedicures--I postal mailed it and everything. I was almost sure that they would be able to attend and not really have to pencil us in, but I wanted them to feel special rather than just calling or e-mailing them with the information. It worked! They were both excited and anxious for Sunday. Plus, they both loved getting the surprise invitation.


Being that I didn't put where we were going on the invites our mom's were anxious to find out where we would end up. We went to Mimi's for breakfast and a nearby spa for pedicures. Thankfully I had reservations for both and we got right in! Our morning was perfect. Breakfast was super yummy and the pedicures were so relaxing.

After brunch on the way to our pedicure appointment

Enjoying our pedicures--yes, Larry had one too ;)

Larry's mom, Larry, my mom <3

Mother's day was perfect! It was fun, relaxing, and I was able to spend quality time with the people I love the most. I am very lucky to have an amazing boyfriend, a loving (hopefully future) mother-in-law and a PERFECT mom! I hope I'm half the mom's they are one day. :)
<3 <3 <3
Hope everyone had an amazing Mother's Day!


On a side note: I have reached over 100 followers this past week! Whether you are my friend, read my blog religiously, have found me browsing link parties or just added me for tutorials...whether you comment on my projects or not...whether you've never read through an entire post or if you have read every word of my ramblings and lengthy projects...I thank you. Seeing that number reminds me when posting my next project it may inspire even just ONE of you to create something you may not otherwise have. :) Thank you again!

signature